Overview of Rasterization Algorithm
The Rasterization Algorithm
本篇博客以这篇文章为基础。
在计算机图形学中,我们可以将渲染过程分为两个部分:可见性与着色。可见性问题指的是判断三维物体中的哪些部分对于相机来说是可见的。物体或场景中某些部分可能会在相机的可视范围之外,或者被其他物体所遮挡,都会导致对应部分的不可见。
解决可见性问题有两种思路,分别是光线追踪与光栅化。
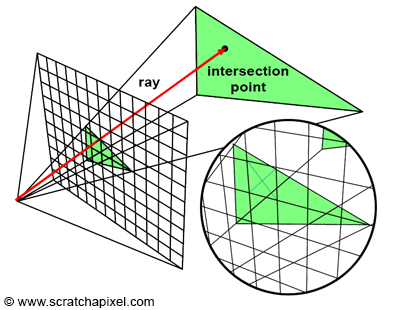
对于光线追踪来说,我们需要遍历图像中的每个像素,并构建一条光线,判断光线方向上是否有物体能够与光线碰撞,如果存在这样的相交点,则计算出相交点与相机之间的距离。从本质上来说,光线追踪的算法需要两层循环,在外层循环中,我们遍历图片中的所有像素,在内层循环中,我们遍历场景中的所有物体。下面是光线追踪的伪代码:
1
2
3
4
5
6
7
8
9
10
11
12
13
14
15
16
17
18
19
20
for (each pixel in the image) {
    // 构建光线
    Ray R = computeRayPassingThroughPixel(x,y);
    float tClosest = INFINITY;
    Triangle triangleClosest = nullptr;
    for (each triangle in the scene) {
        float tHit;
        // 相交判断
        if (intersect(R, object, tHit)) {
             if (tHit < tClosest) {
                 tClosest = tHit;
                 triangleClosest = triangle;
             }
        }
    }
    if (triangleClosest) {
        // 着色计算
        imageAtPixel(x,y) = triangleColorAtHitPoint(triangleClosest, tClosest);
    }
}
需要注意的是,我们假设了所有物体都是由且仅有三角形构成的,所以与其说是遍历物体,本质上是在遍历场景中的三角形。我们可以结合下图来理解光线追踪的过程:
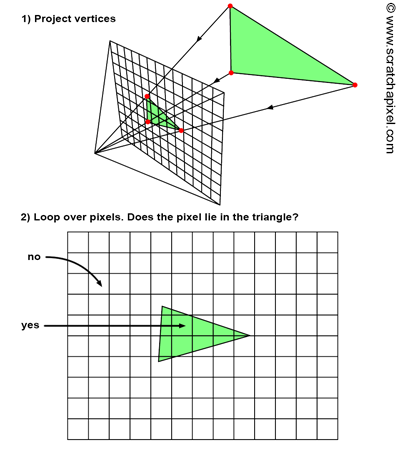
可以说,光线追踪算法是以图像为核心的。而光栅化则采用了相反的思路来解决可见性问题,也就是通过透视投影来将三角形投影到屏幕上,即将三角形的三维表示转换为二维的形式。具体的实现过程是将构成三角形的顶点投影到屏幕上。投影完成后,光栅化算法会为被二维三角形覆盖的图片像素填充颜色。所以说,光栅化算法是以物体为核心的。整个过程如下图所示。
光栅化算法同样可以通过两层循环实现,在外层循环中,遍历并投影场景中的所有三角形,然后在内层循环中,我们迭代图像中的所有像素,判断当前像素是否落在当前三角形的投影图像范围内。本质上,两种算法的内外循环是相反的。下面是光栅化算法的伪代码:
1
2
3
4
5
6
7
8
9
10
11
12
13
// Rasterization algorithm
for (each triangle in the scene) {
    // STEP 1: Project vertices of the triangle using perspective projection
    Vec2f v0 = perspectiveProject(triangle[i].v0);
    Vec2f v1 = perspectiveProject(triangle[i].v1);
    Vec2f v2 = perspectiveProject(triangle[i].v2);
    for (each pixel in the image) {
        // STEP 2: Determine if this pixel is contained within the projected image of the triangle
        if (pixelContainedIn2DTriangle(v0, v1, v2, x, y)) {
            image(x, y) = triangle[i].color;
        }
    }
}
现在,我们描述了光栅化算法最简单的形式,但还有很大的算法优化空间。此外,还有一些问题需要额外的方法才能解决,例如图像中一个像素可能与多个投影的三角形重叠时,应该如何决定哪个三角形是可见的。下面我们再深入探讨一下。
Optimizing the Rasterization Process: Utilizing 2D Triangle Bounding Boxes
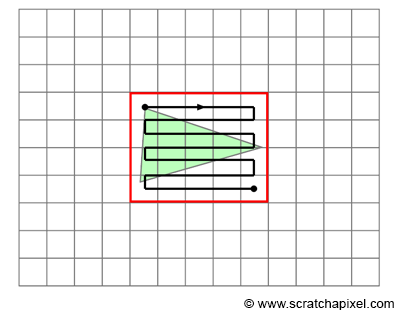
我们提到,光栅化算法中,需要遍历图像中的所有像素,判断当前像素是否在当前三角形的二维投影图像范围中。但实际上可能只有很小一部分像素被三角形包围。遍历不必要的像素并判断是否被包围,显然会造成性能的浪费。
有很多种方法可以减少测试的像素数量,其中最常用的是计算三角形投影的2D包围盒,然后只遍历包围盒中的像素,而非整个图像。如下图所示:
计算三角形包围盒很简单,只需要在raster space中计算出包围盒的两个极值点即可:
1
2
3
4
5
6
7
8
9
10
11
12
13
Point2f bboxMin = INFINITY, bboxMax = -INFINITY;
Point2f vProj[3];
for (int i = 0; i < 3; i++)
{
    vProj[3] = projectAndConvertToNDC(triangle[i].v[i]);
    // coordinates are in raster space but still floats, not integers
    vProj[i].x *= imageWidth;
    vProj[i].x *= imageHeight;
    if (vProj[i].x < bboxMin.x) bboxMin.x = vProj[i].x;
    if (vProj[i].y < bboxMin.y) bboxMin.y = vProj[i].y;
    if (vProj[i].x > bboxMax.x) bboxMax.x = vProj[i].x;
    if (vProj[i].y > bboxMax.y) bboxMax.y = vProj[i].y;
}
当我们计算出三角形的包围盒后,我们基本上只需要遍历包围盒范围中的像素即可:
1
2
3
4
5
6
7
8
9
10
11
12
uint xmin = std::max(0, std::min(imageWidth - 1, std::floor(bbmin.x)));
uint ymin = std::max(0, std::min(imageHeight - 1, std::floor(bbmin.y)));
uint xmax = std::max(0, std::min(imageWidth - 1, std::floor(bbmax.x)));
uint ymax = std::max(0, std::min(imageHeight - 1, std::floor(bbmax.y)));
for (y = ymin; y <= ymax; ++y) {
    for (x = xmin; x <= xmax; ++x) {
        // Check if the current pixel lies within the triangle
        if (pixelContainedIn2DTriangle(v0, v1, v2, x, y)) {
            image(x,y) = triangle[i].color;
        }
    }
}
Understanding the Image Buffer and Frame Buffer
Frame buffer是一个与图像尺寸匹配的二维颜色数组,每个元素存储了一个表示颜色值的三位向量。当所有的三角形被光栅化后,framebuffer将包含场景的完整图像,我们可以将帧缓存区中的内存保存到文件中,以查看渲染结果。或者通过窗口程序来实时查看。我们暂时先选择前者。
Resolving Overlaps with the Depth Buffer: Handling Multiple Triangles per Pixel
光栅化算法的主要目的是解决可见性问题,而解决可见性问题的核心就在于Depth Buffer。depth buffer本质上是一个与图像尺寸相同的二维数组,但与frame buffer不同的是,depth buffer存储的是表示深度值的浮点数。
当我们想要确定三角形是否可见时,我们将比较当前片段的深度值与depth buffer中的深度值,如果片段中的深度值更小,则表明当前三角形距离相机更近,是可见的,同时我们要用当前片段的深度值来更新depth buffer中的深度值。
我们可能会好奇如何计算相机到三角形之间的距离,我们暂时假设这个值由函数pixelContainedIn2DTriangle计算,先来看看深度测试过程的伪代码:
1
2
3
4
5
6
7
8
9
10
11
12
13
14
15
16
17
18
19
20
21
22
23
24
25
26
27
// A z-buffer is merely a 2D array of floats
float buffer = new float[imageWidth * imageHeight];
// Initialize the distance for each pixel to a significantly large number
for (uint32_t i = 0; i < imageWidth * imageHeight; ++i)
    buffer[i] = INFINITY;

for (each triangle in the scene) {
    // Project vertices
    ...
    // Compute bbox of the projected triangle
    ...
    for (y = ymin; y <= ymax; ++y) {
        for (x = xmin; x <= xmax; ++x) {
            // Check if the current pixel is within the triangle
            float z;  // Distance from the camera to the triangle
            if (pixelContainedIn2DTriangle(v0, v1, v2, x, y, &z)) {
                // If the distance to that triangle is shorter than what's stored in the
                // z-buffer, update the z-buffer and the image at pixel location (x,y)
                // with the color of that triangle
                if (z < zbuffer(x, y)) {
                    zbuffer(x, y) = z;
                    image(x, y) = triangle[i].color;
                }
            }
        }
    }
}
Looking Ahead: Further Explorations in Rasterization
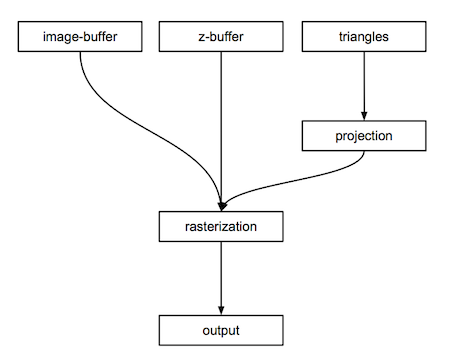
现在,我们对光栅化算法有了一个大概的了解。想要实现一个光栅器,我们需要实现以下模块(或者说,光栅器由以下部分组成)
- image buffer
- depth buffer
- 场景中的物体
- 将三角形顶点投影到canvas上的函数
- 光栅化三角形投影的函数
- 将image buffer中的内容保存到本地上的函数
如下图所示:


